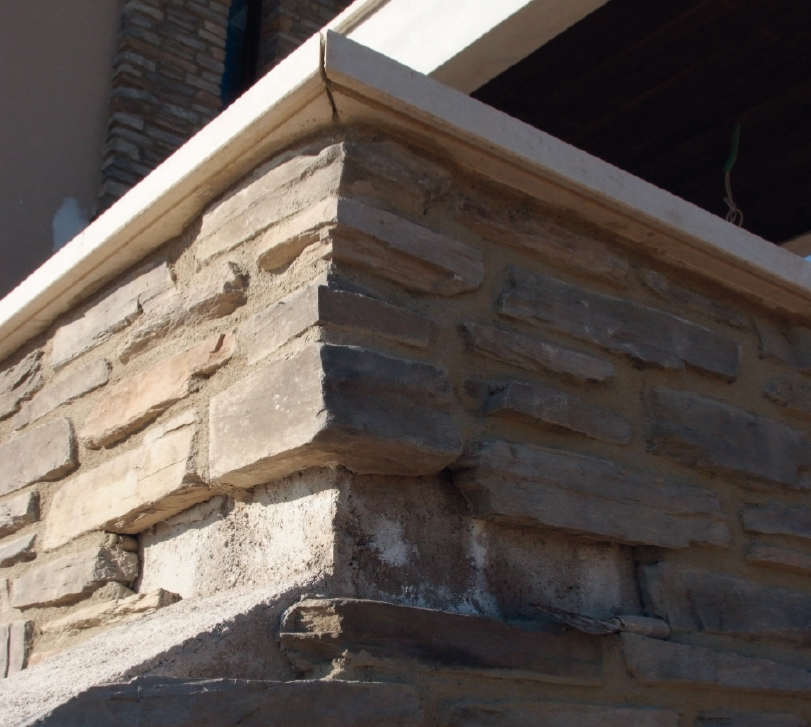
3 | WATERPROOFING
murogeopietra is not a waterproof wall covering, murogeopietra has been designed for minimum absorbency and maximum breathability features, however the installation base must be prepared correctly to prevent water seeping into walls.
The main cases of infiltration have transpired in relation to the following:
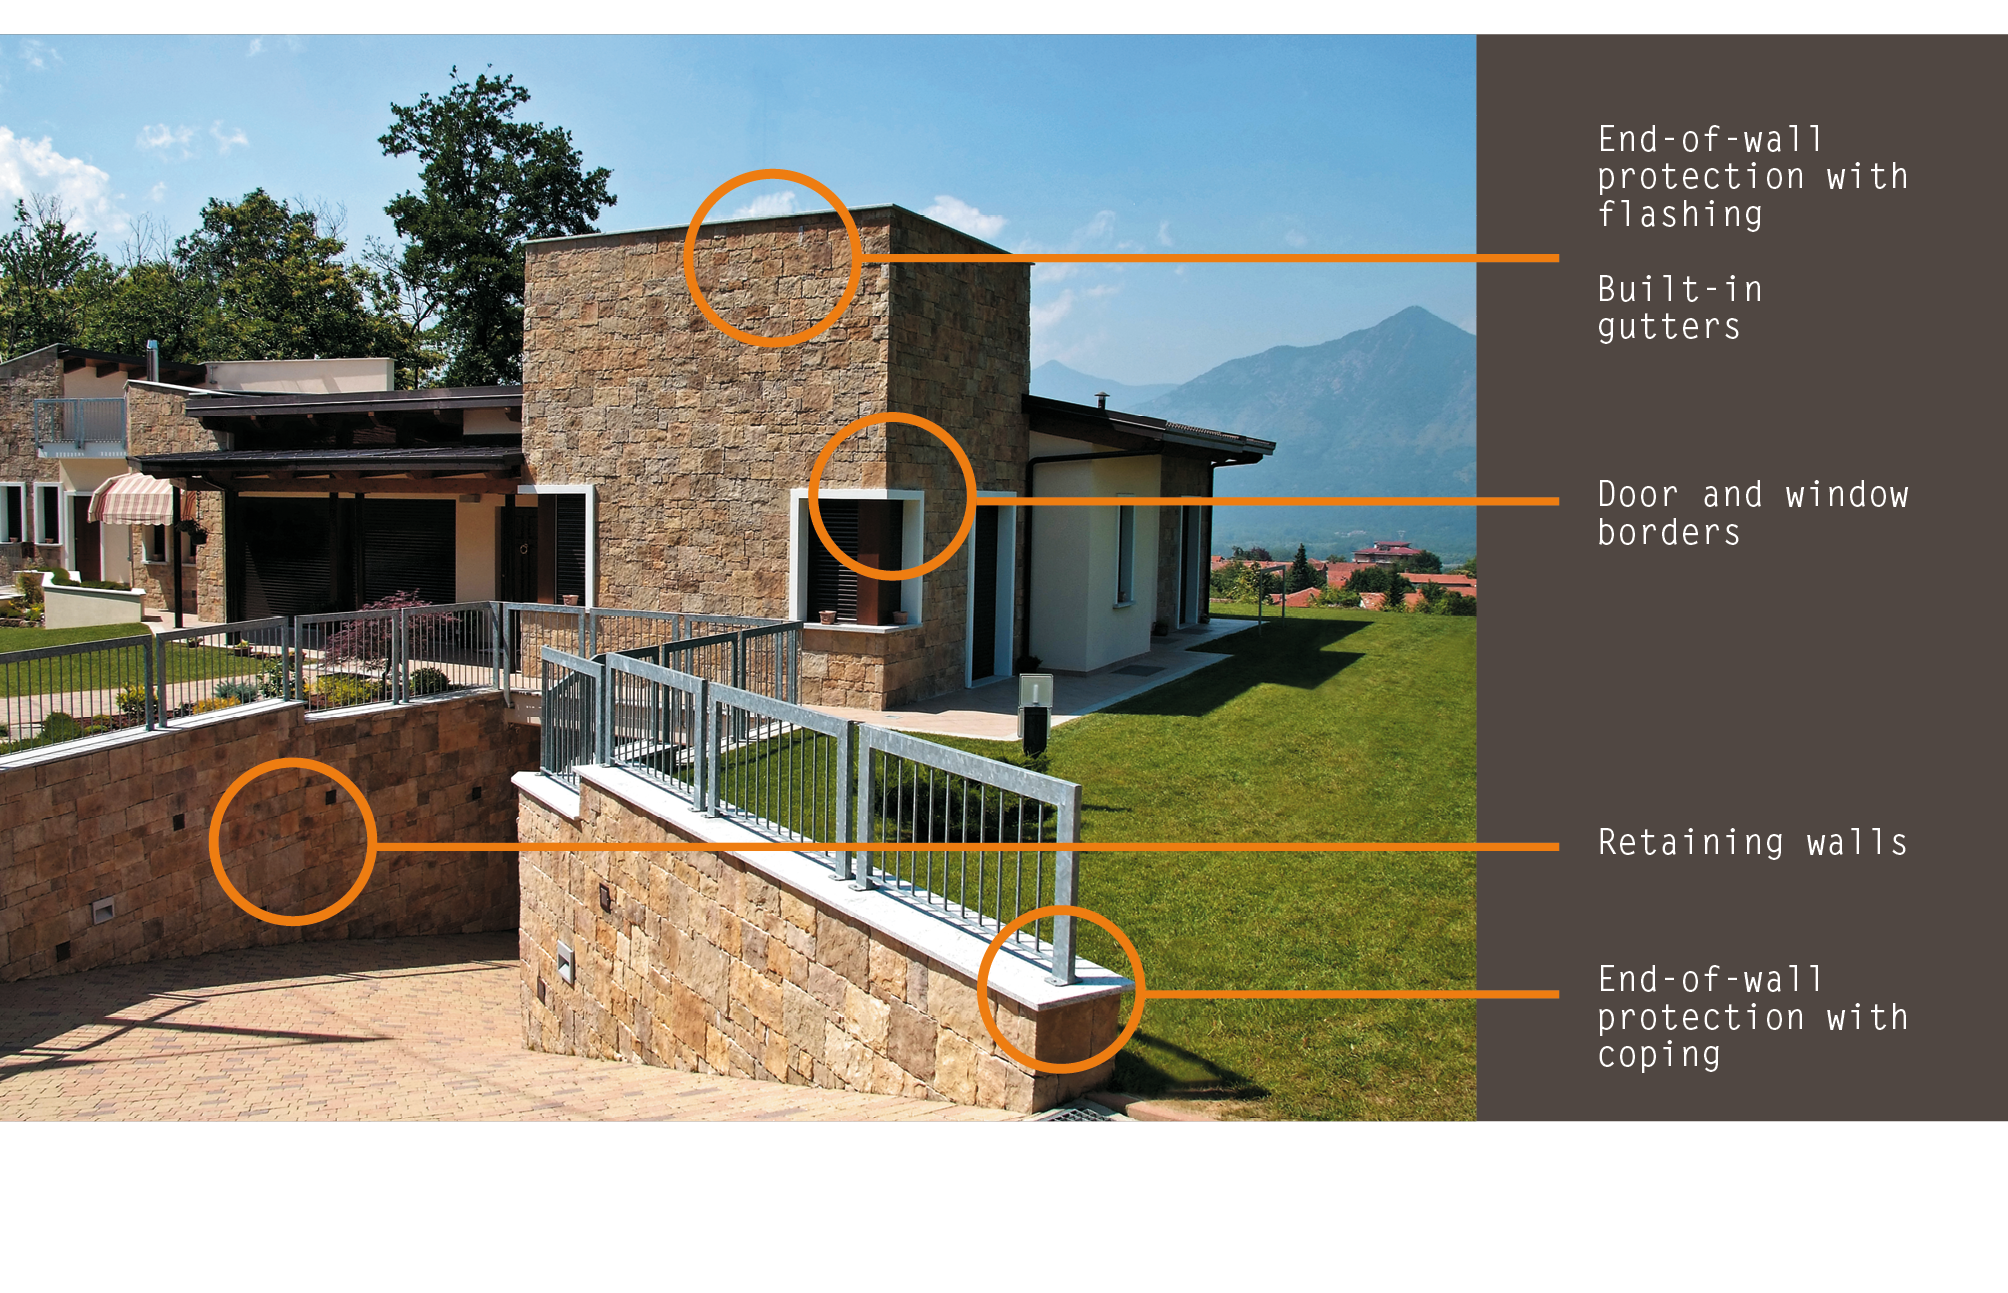
3.1 | RETAINING WALLS
3.2 | DOWNPIPE FLASHING
3.3 | TERRACES: PAVING and PARAPETS
3.4 | BUILT-IN GUTTERS
3.5 | END-OF-WALL PROTECTION with FLASHING
3.6 | DOOR and WINDOW BORDERS
3.7 | THERMAL PROTECTION with COPING
3.8 | WALL TOPS in MANUFACTURED STONE

ATTENTION | It is very important to put significant focus on water drainage and waterproofing.Water infiltrations can lead to the formation of saltpetre and dampness on walls, with consequences of corrosion on the stone.
murogeopietra Installation can leave a multitude of wipe marks that are not visible to the naked eye; consider the dry-stack or semi-dry-stack technique in particular - a perfect seal is impossible during grouting. Note that waterproofing techniques using glazing liquids or other products on wall coverings after installation have not given satisfactory results in terms of performance and watertight over time.
Various suggestions based on experience gained on site have been outlined below, however it should be remembered that the ideal solution can be provided by the manufacturer or waterproofing specialists.
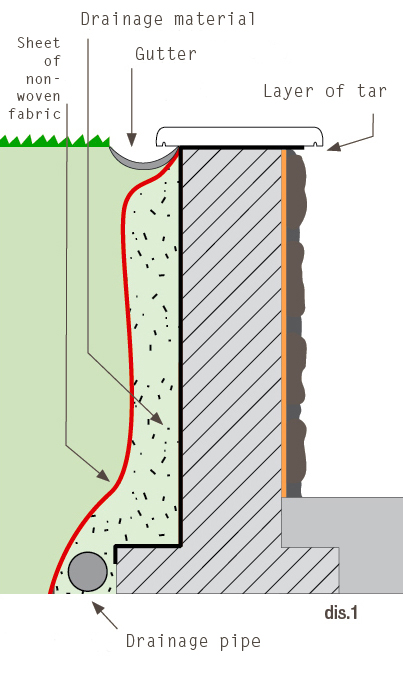
Retaining walls must be waterproofed on the inside, in contact with the ground, with a layer of tar extending up the full height of the wall. It is advisable to continue until the outside of the wall is reached, working horizontally until the coat is 3/4 the thickness of the wall, in order to also prevent infiltrations near the adhesive behind the wall covering. Any stone coping added afterwards may not ensure joints are adequately sealed. To prevent standing water, insert drainage material behind the wall and a perforated drainage pipe lower down at foundation level. Protect the drainage material from clay soil with a TNT filter to ensure it continues to function. Check there are no areas of standing water on the embankment when it rains, and create a drainage channel if necessary.
Attention: Waterproofing the outside of the wall with special materials, such as osmotic cement, could be problematic as the water could still penetrate the wall, collect behind the waterproofing and cause breakage and detachment when it freezes.
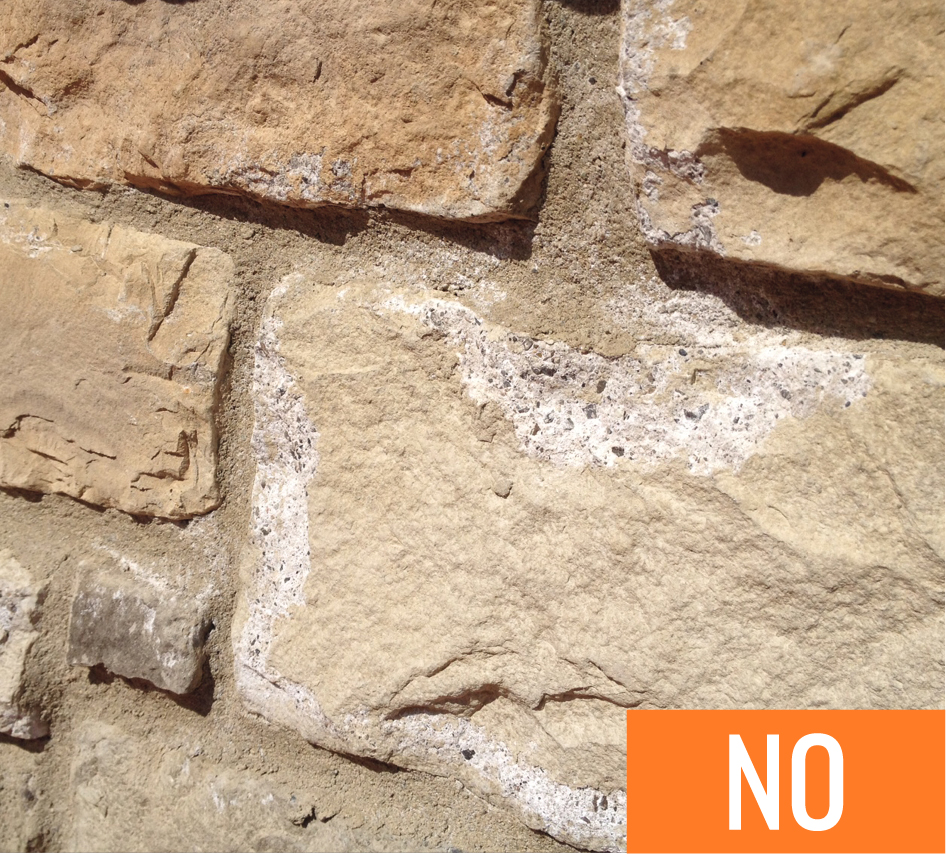
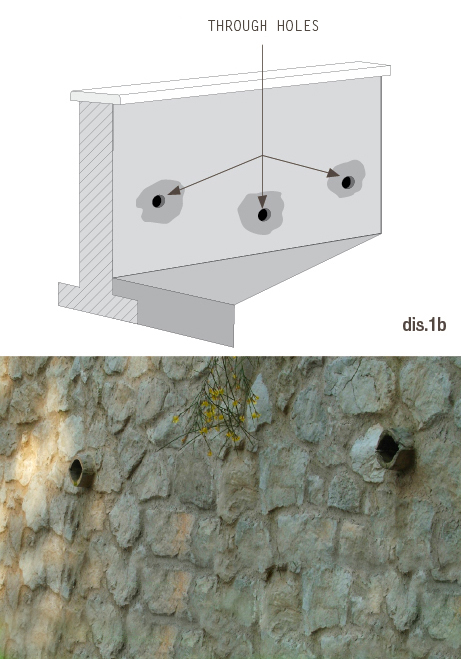
In the photos | an example of the consequences of water infiltration when the base has not been prepared suitably before installing the wall covering.
Absolutely murogeopietra is not a waterproof wall covering and cannot be used as protection against water without issues arising.
The lack of suitable base waterproofing can lead to fairly serious surface dampness issues that can be difficult to treat.
Unfortunately we deal with such problematic situations on a regular basis and have outlined some possible treatment solutions below, without guaranteeing that they will resolve the situation.
Manifestation of slight dampness.
Strip and clean the base of any impurities by means of abrasive blasting or using a pressure washer, and apply a double layer of Geocoll®.
Manifestation of significant dampness.
In the presence of significant amounts of dampness and localised areas of water behind walls, make through holes for drainage in the relevant areas before gluing the wall covering appropriately in accordance with the gaps (Figs.1a/1b).

Manifestation of extensive dampness.
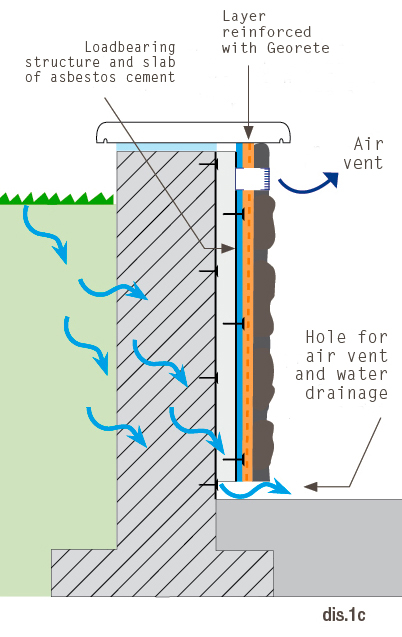
In irrecoverable situations a false wall must be created with an air gap >3 cm using vertical columns in steel/aluminium and asbestos cement slabs. Make drainage holes at the bottom and ventilation holes at the to, which should also be included in the wall covering. Apply a double coat of Geocoll®adhesive with Georete fibreglass mesh reinforcement, overlapping by at least 10 cm on corners and joints. Install the stone covering once this has hardened (Fig 1c).
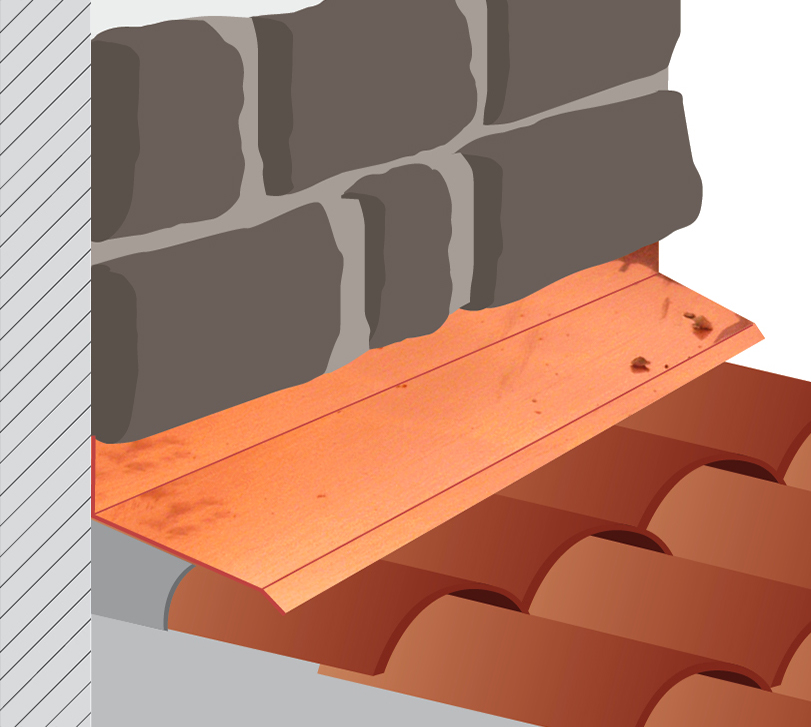
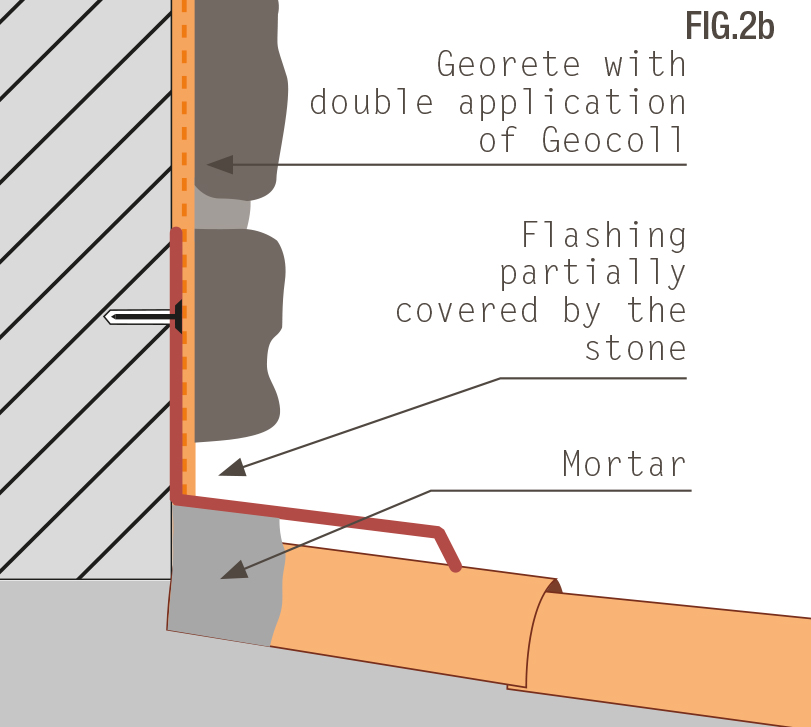
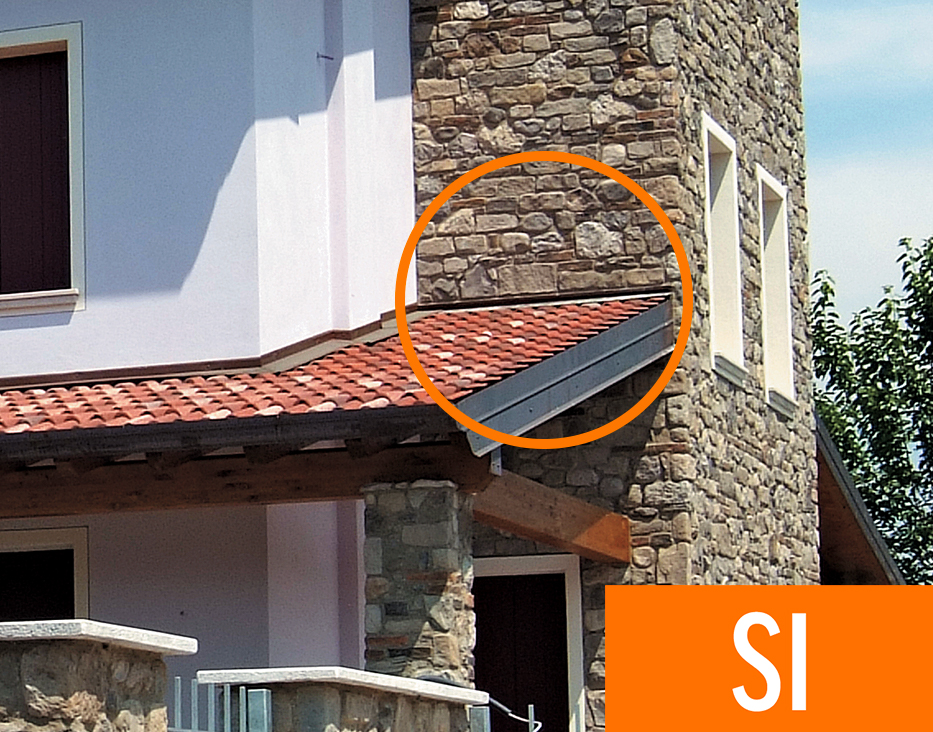
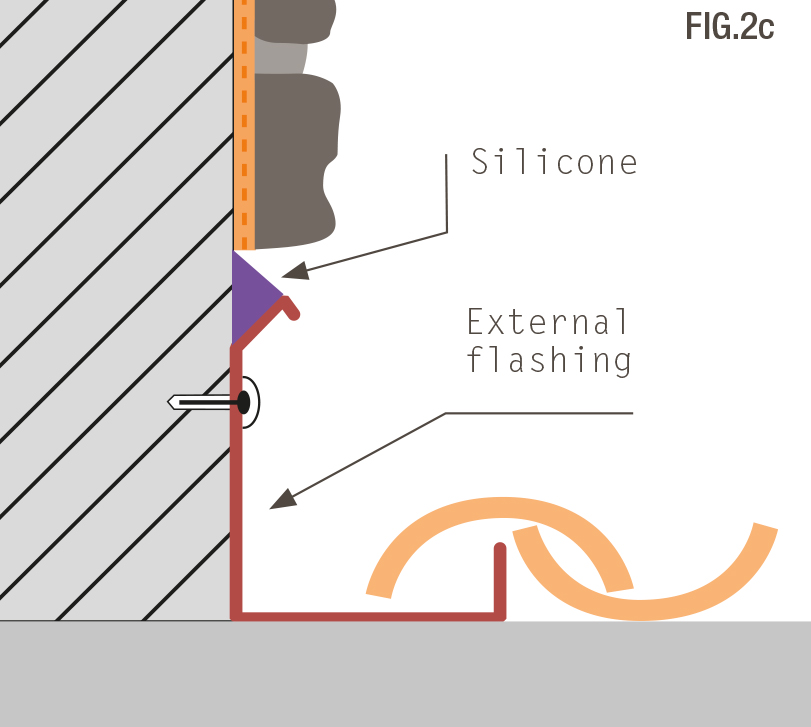
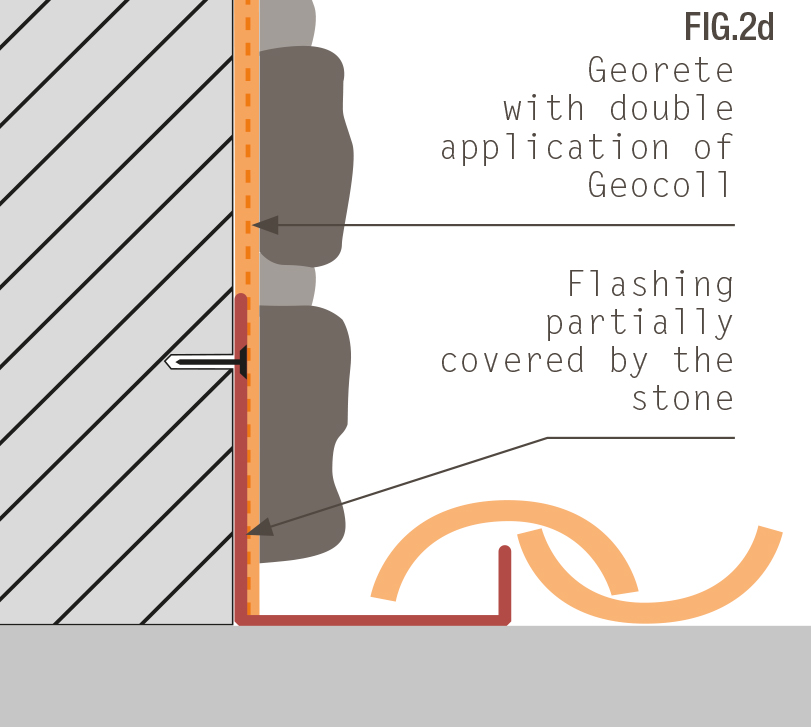
Preventing water from standing and seeping in behind the stone is essential for ensuring the murogeopietra stays securely attached to the wall over time. Ensure suitable guttering has been designed correctly to drain away rainwater. The various types of flashing positioned to protect the point at which the roof meets a wall supporting other underlying roof pitches must always be fitted before the murogeopietra covering. The wall covering, bordering a roofing, can start flush with the flashing after sealing it at one end with silicon, or overlap it on one side using metal mesh or Georete fibreglass mesh set in Geocoll.
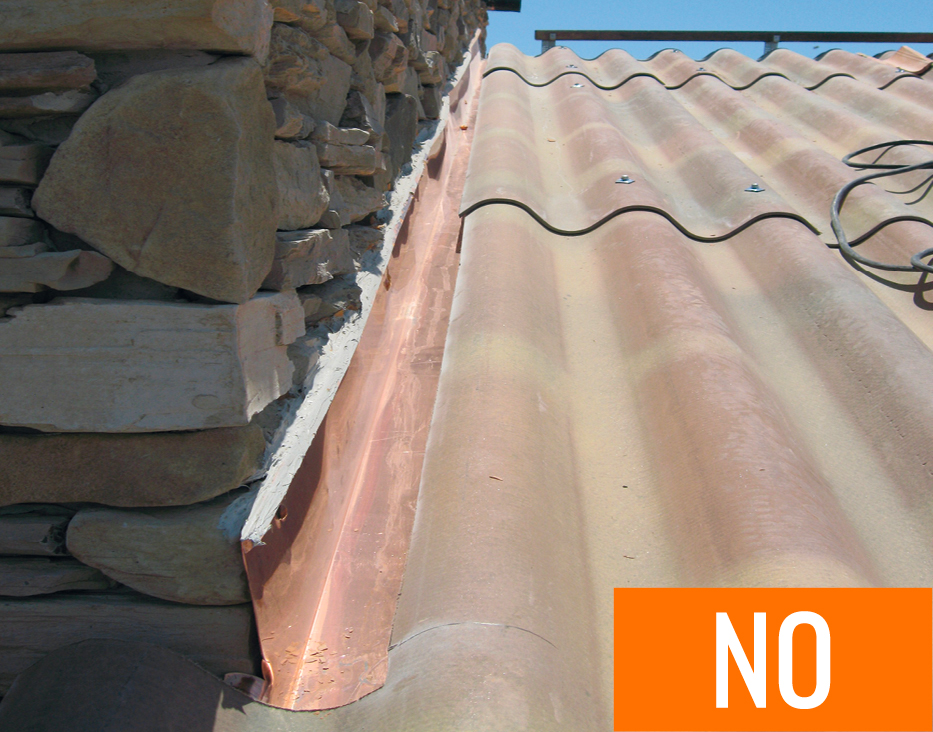
In the picture | an example of incorrect installation.
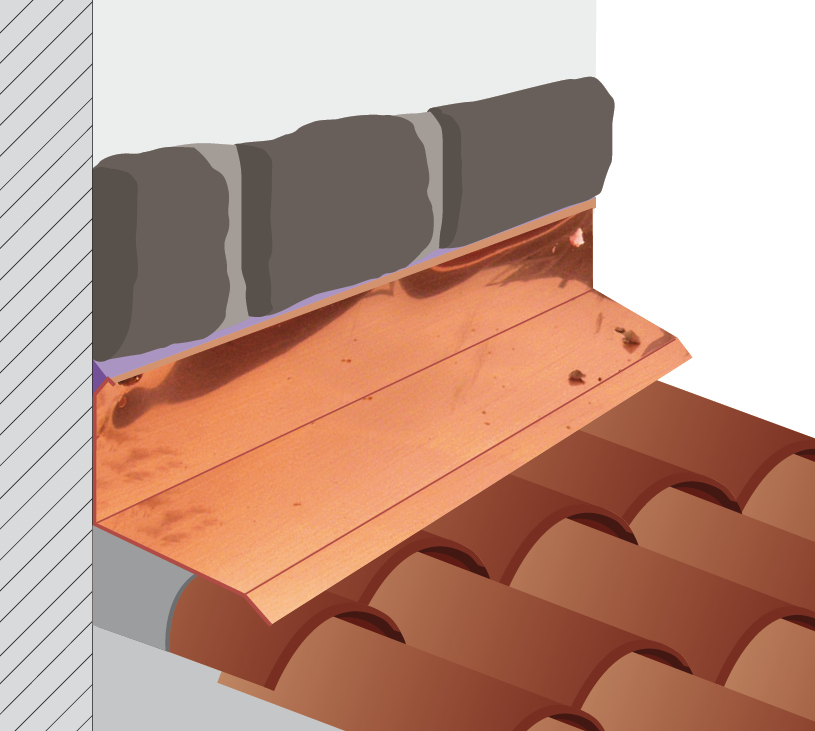
INSTALLATION EXAMPLE ABOVE ROOFING

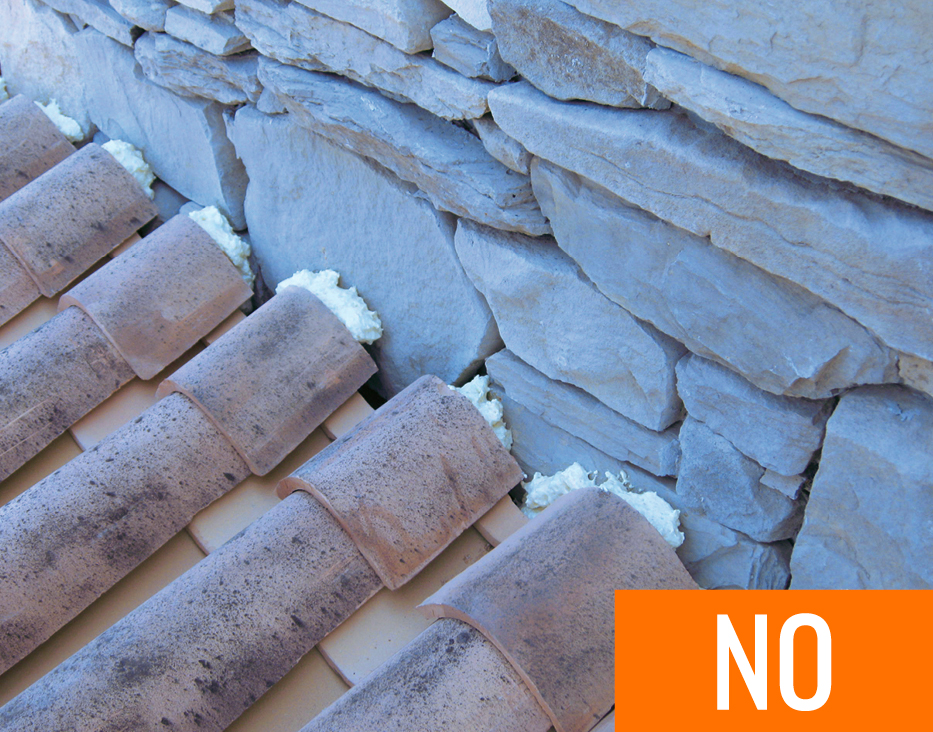
In the pictures | an example of incorrect installation.
INSTALLATION EXAMPLE UNDER ROOFING

Waterproofing terraces can still be the cause of many problems even today. Even though there are reliable tested materials available, the same mistakes continue to be repeated, be it due to poor professional services, cutting corners to save money, or basic negligence. The following are only a few cases that involve murogeopietra:
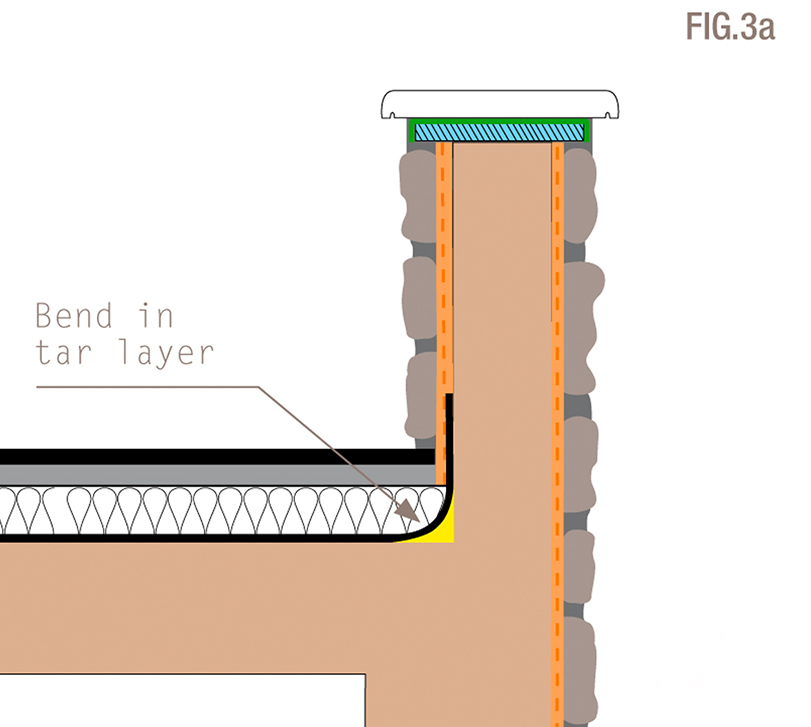
The tar’s critical breaking point is the internal corner therefore this must be offset by filling it out significantly, with it rounded off or set at 45°.
The tar lip must be over the edge of the skirting in the case where murogeopietra is also on the terrace’s internal wall (Fig.3a).
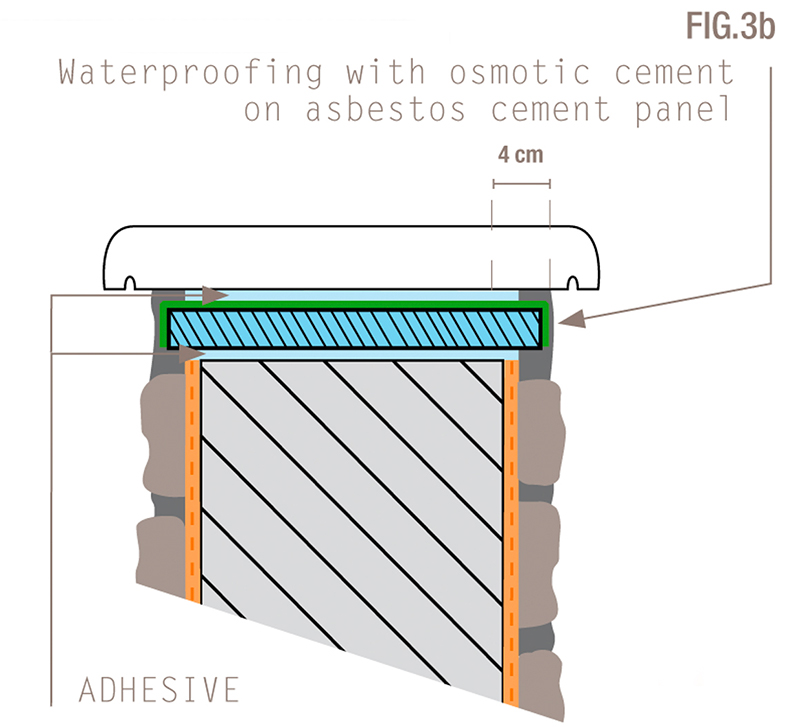
Before installing the stone, finish the head of the parapet by gluing a waterproofed with osmotic cement asbestos panel protruding at least 4 cm over the thickness of the murogeopietra, and then cover with coping (Fig.3b).
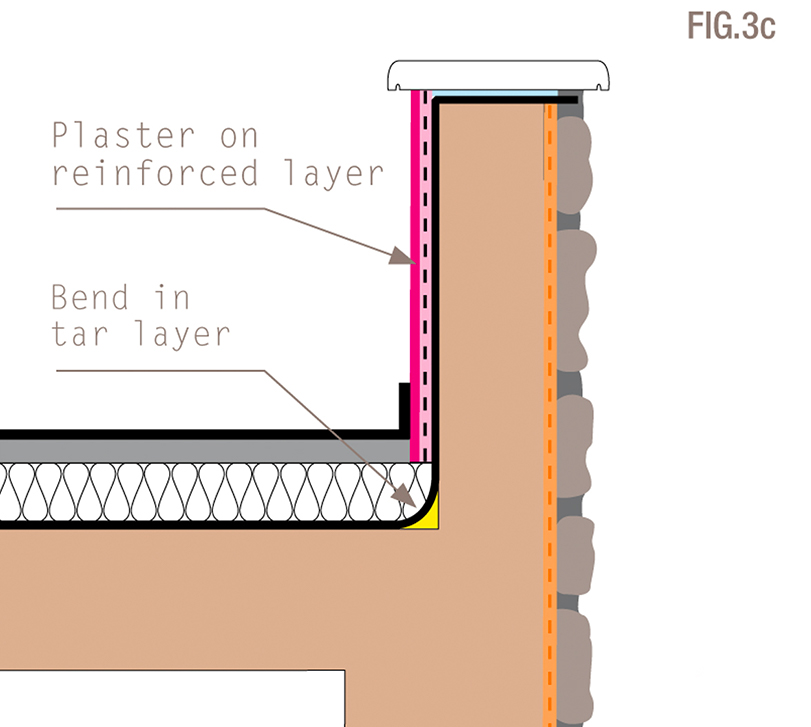
in the case of an interior plaster finish it is advisable to waterproof by continuing the tarring of the floor for the entire height of the parapet and proceeding under the cap edge up to 3/4 of the thickness of the murogeopietra. The interior plasterwork can be implemented using metal mesh or similar (Fig. 3c).
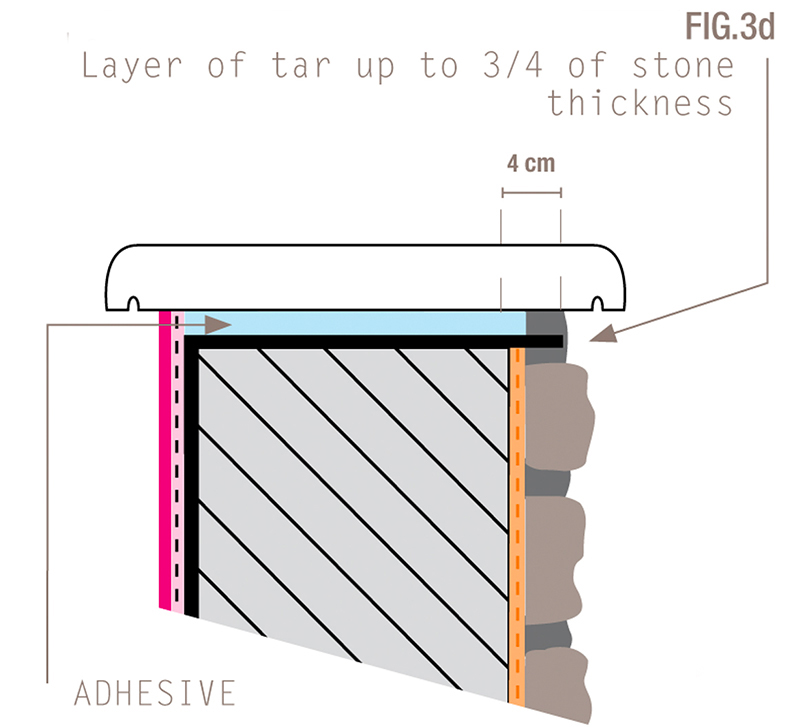
The top coping can be glued directly above the layer of tar. (Fig. 3d).
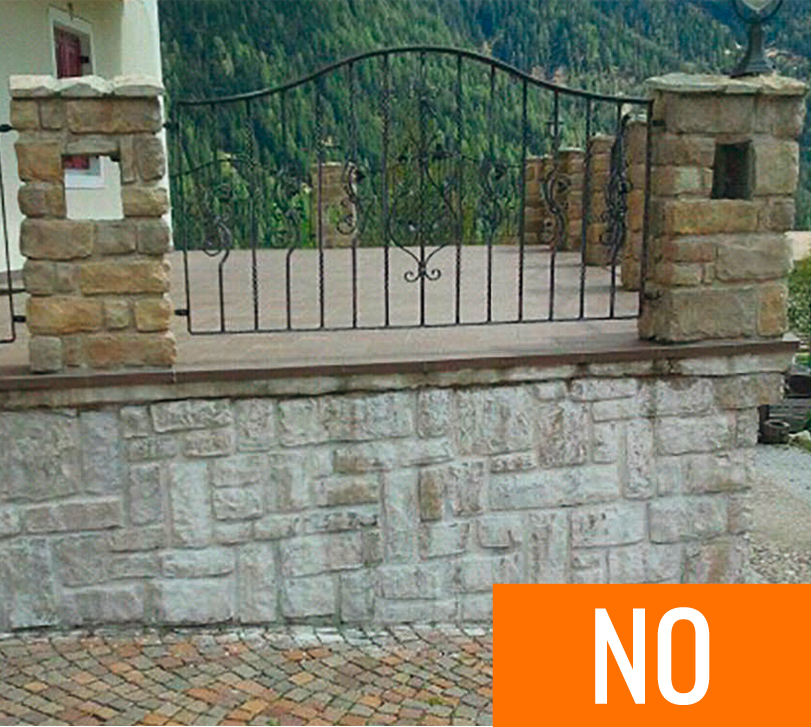
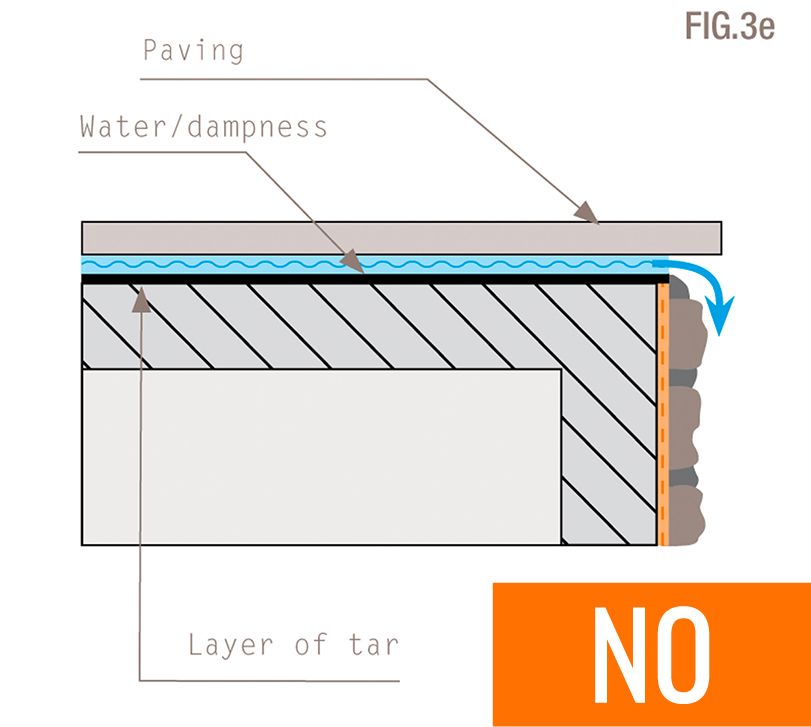
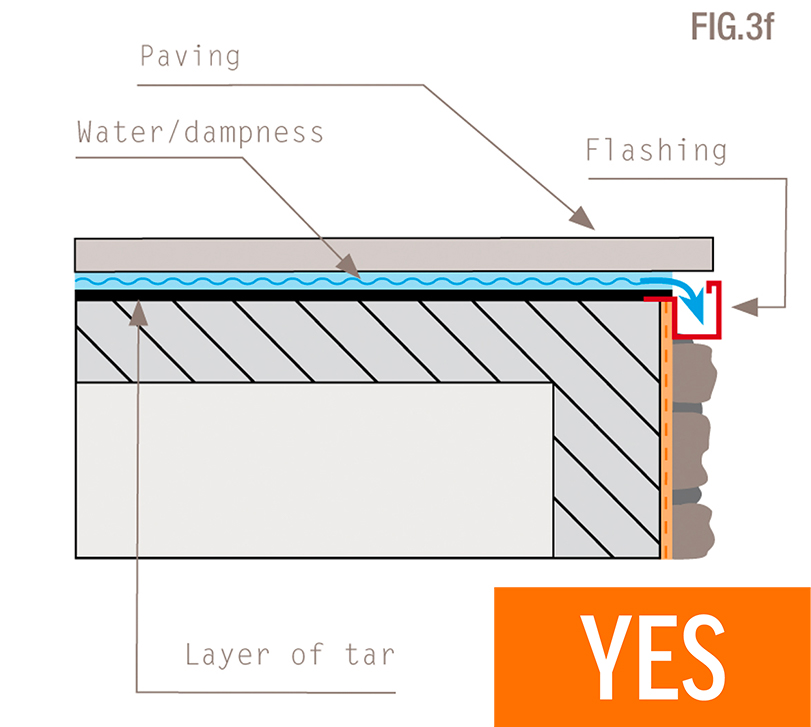
In the picture above | A clear case of a terrace with no gutter; this is a common mistake that causes significant aesthetic damage and corrodes the stone. Figure 3e shows the incorrect installation used in the example in the photo and figure 3f shows the ideal solution.
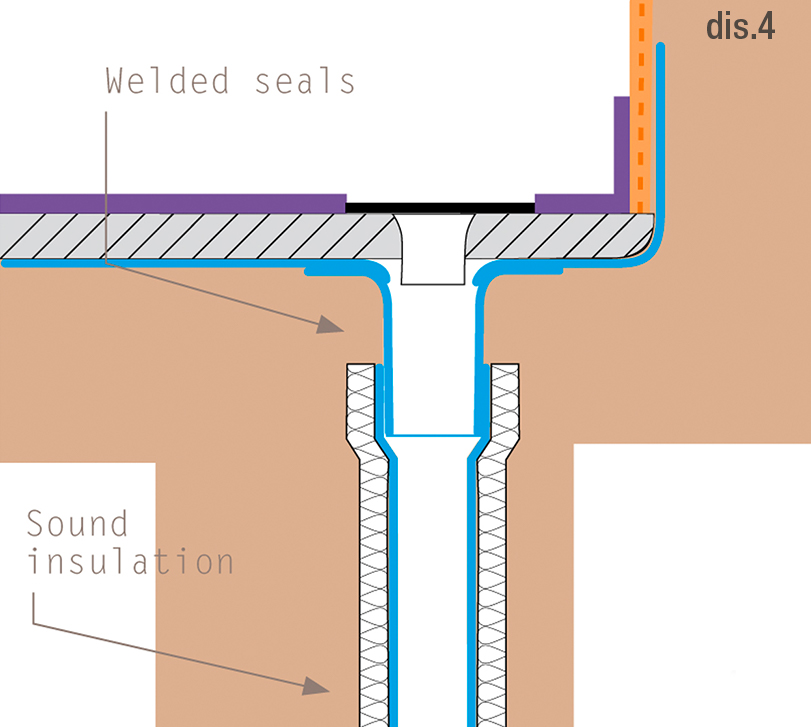
Rainwater drainage pipes on roofs or terraces are often built into the structure for aesthetic or practical reasons.
Unfortunately, imperfect joints in various sections or the lack of insulation around them to prevent seepage can cause dampness or salts to form on the face, which then appear on the surface of the plaster and the murogeopietra (Fig. 4).
Figure 4 | shows an example of a possible correct installation.
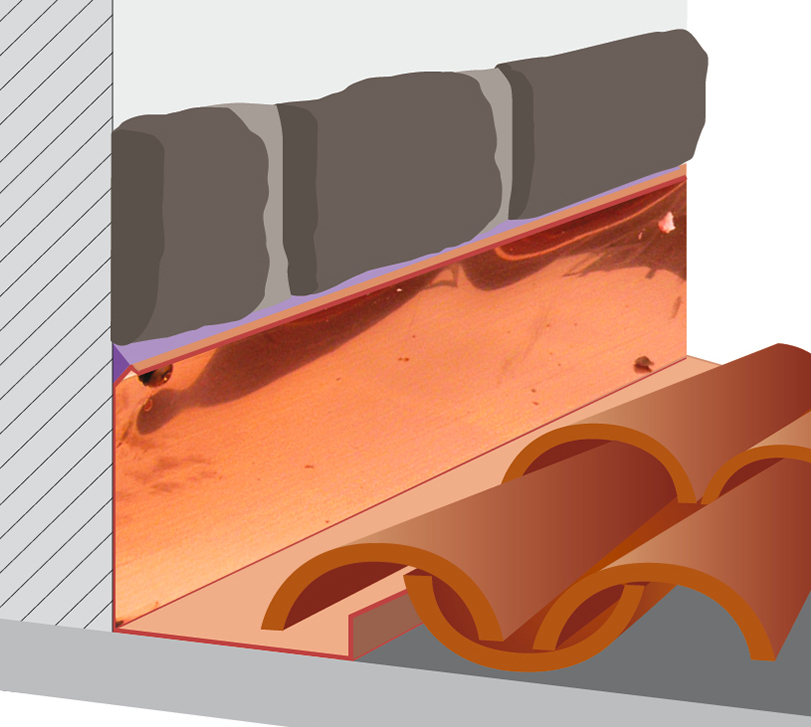
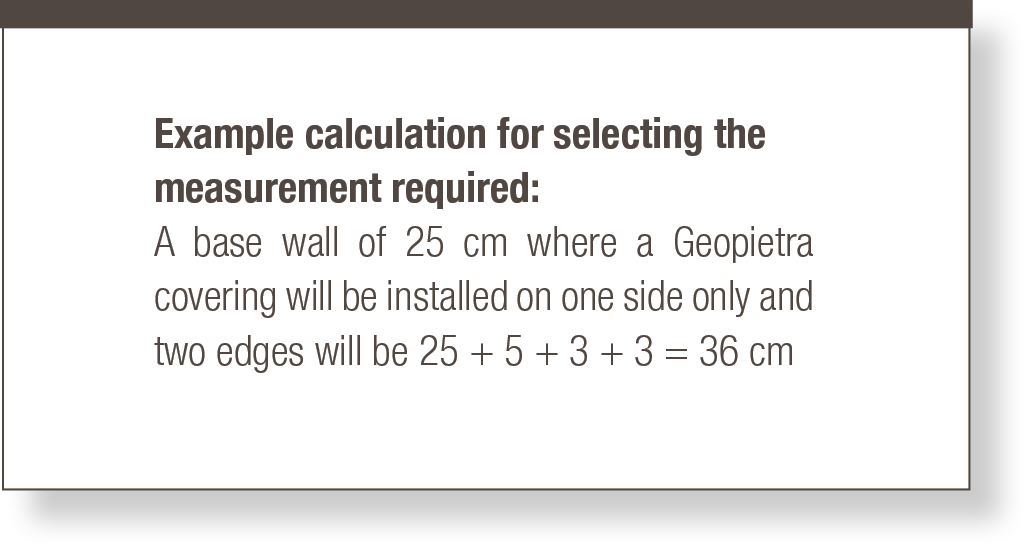
Another critical point is the roofing at the end of the wall, which must provide suitable waterproofing protection over the long-term. The best solution is still roofing in stainless steel or copper of suitable shape and size, without the use of silicone or elastomer joints that could come off through time (see examples of finishes in figure 5a).

The sheet roofing will be secured to the top of the wall following the insertion of an OSB wood panel, after having installed the murogeopietra. The OSB panel will be secured to the structure using wall plugs in accordance with the required gradients, and flashing secured above it with waterproof screws and special covers to complete the solution (Fig. 5b).

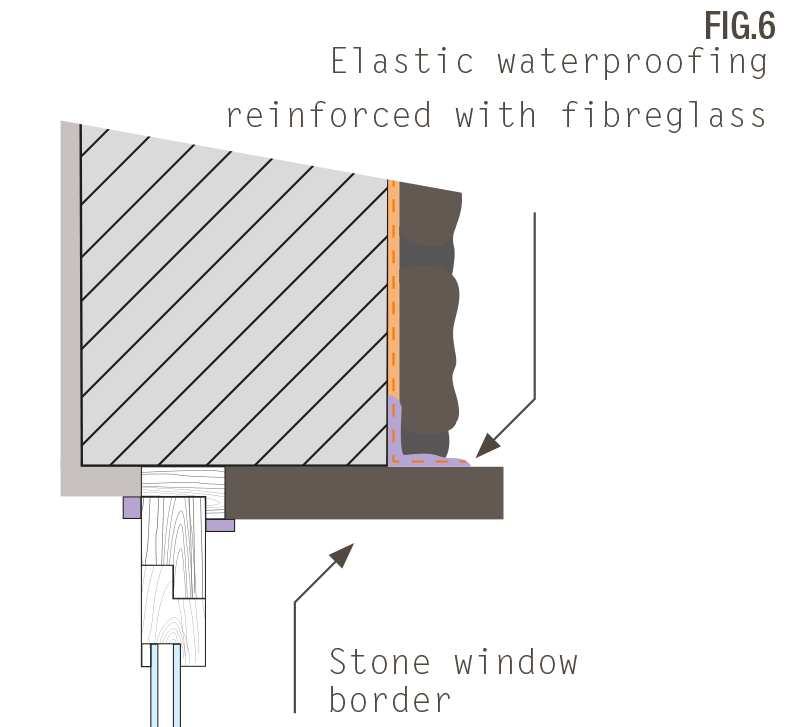
When finishing off doors and windows maximum care must be taken with joints between coverings and the material bordering the opening, where thermal bridges can transpire and thermal expansion can cause cracks.
It is advisable to waterproof the area with special elastic material reinforced with fibreglass before installing the murogeopietra (Fig. 6).
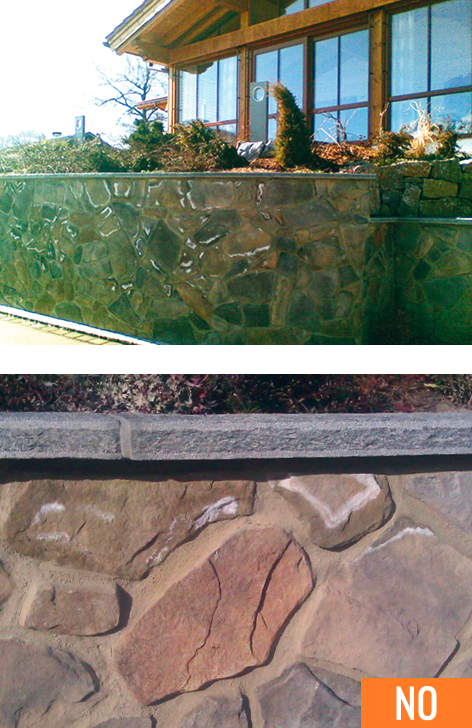
Another critical point we have noted is coping at the end of walls, which must also be suitably prepared to ensure long-lasting protection. The following points must be considered in particular:
1. Water can run horizontally along short sections under the outer edge of coping. A drip edge of suitable dimensions should be fitted to prevent water standing and seeping into the structure.
2. Roofing material (stone or agglomerates) expanding incompatibly with the structure, causing cracks on joints resulting in water penetration. Before installing the stone a horizontal waterproof layer must be applied.
For this purpose an asbestos cement panel can be glued to the top of the wall, protruding at least 4 cm from the murogeopietra and lying flush with any plasterwork, and waterproofed with paste or cement-based materials and fibreglass reinforcement, enabling subsequent application of adhesive and the coping (Fig.7).

In the photos | Sections detached due to water infiltrations at the top of the wall, generated by the lack of suitable waterproofing.


In oltre vent’anni di lavoro in molti cantieri in Italia e in Europa, Geopietra ha potuto avvertire l’esigenza di realizzare numerosi accessori per la finitura dei suoi rivestimenti. È da questa riflessione che nasce GeoCover le innovative copertina per muri, ad alta resistenza e ingeliva.

This is the first in a series of accessories provided for customers to improve the look and functionality of their walls. GeoCover has been designed to match perfectly with the various colours of the Geopietra models, and the new installation system also resolves the issue of water penetrating joints. In terms of dimensions a fixed length of 1 m is available, and varying widths of 31 / 36 / 41 / 46 / 51 / 56 cm, which have been finished on all 4 sides. Square pillar heads measure 31 / 36 / 41 / 46 / 51 / 56 cm.
Coping and pillar heads are provided with drip edges.
Measurements were chosen by considering walls of width 20 cm, 25 / 30 / 35 / 40 / 45 cm, with the addition of a Geopietra covering approximately 5 cm thick with side edging of 3 cm. If wall measurements differ by multiples of 5 or there is plaster or a petroleum-based coating, having calculated the total with borders, always choose the measurement with a surplus rather than a deficit for maximum protection against bad weather.

We all appreciate the importance of preventing water from penetrating walls from above. Numerous methods have been adopted using stone, cement-bonded agglomerates, copper or steel flashing - in all cases the critical point continues to be the joints between the various pieces.
Pictures of the previous pages show the consequences of water that penetrated a joint between blocks of stone. It doesn’t matter what material is used for grouting between the various elements - atmospheric agents, thermal expansion and structural movements cause water leakage over time. The formation of saltpetre and loose plaster or cladding are the usual results of water penetrating walls. While researching and implementing GeoCover® wall coping, Geopietra® designed and tested a safe simple solution that solves this problem.
Formazioni di salnitro, stacchi di intonaco o di rivestimento, sono conseguenze normali nella muratura con presenza di acqua.
The formation of saltpetre and loose plaster or cladding are the usual results of water penetrating walls. While researching and implementing GeoCover® wall coping, Geopietra® designed and tested a safe simple solution that solves this problem.
A specially-adapted stainless steel plate at the joints on the back of the product channels water infiltrations from the joint outside the wall and its covering.
1. 2. 3. 4. For a professional job always level out the support surface using mortar, creating an inclination for water drainage. For example, in the case of an earth retaining wall, water must be drained towards the ground, therefore an inclination of a few millimetres would be required.


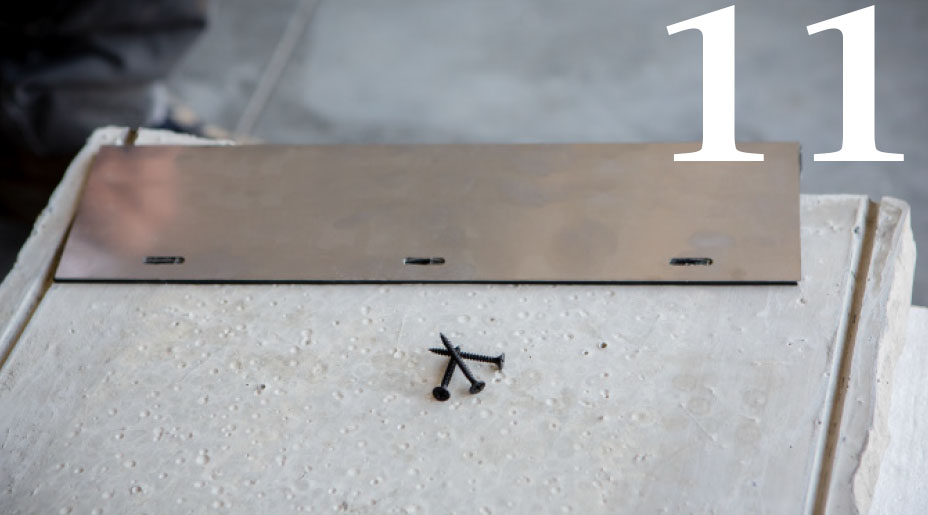
5. A kit is provided with the GeoCover® coping consisting of a stainless steel plate, two adhesive strips of foam material, and the screws required for attachment to the base of the coping, where expansion plugs are already inserted.
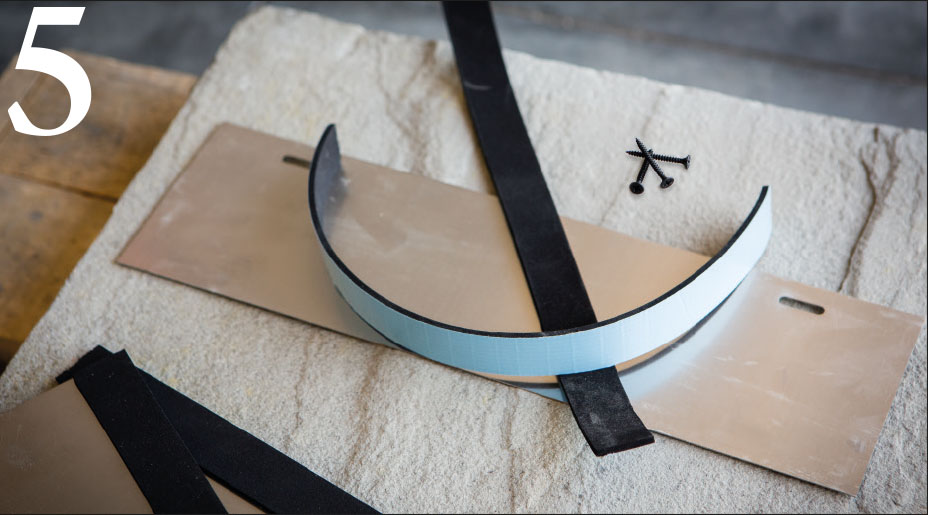
6. Remove the protective paper from the adhesive strips and stick them to the edges of the plate. The foam strips act as a seal between the steel plate and the coping.

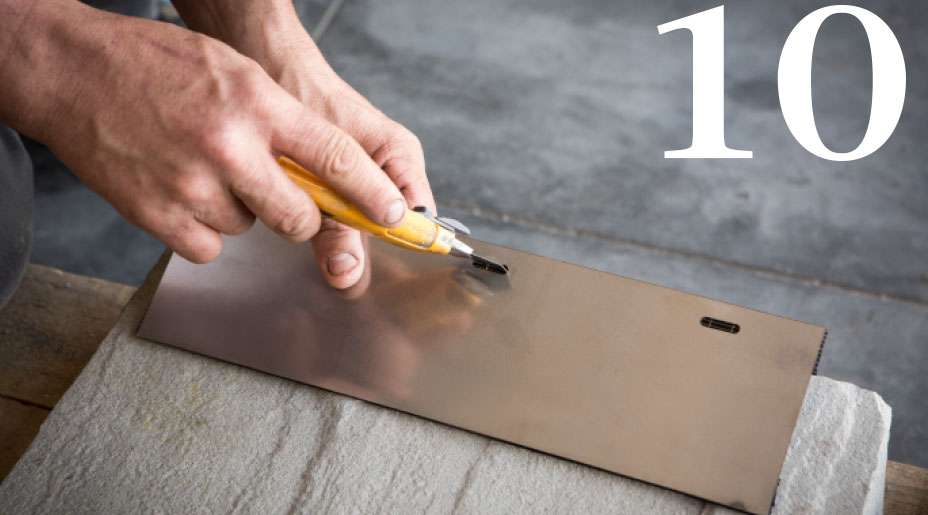
7. 8. 9. With the help of an angle grinder, complete the cut of the drip to the outer edge of the cover.


10. 11. 12. Cut the foam strips in correspondence with the holes used to insert the screws. Position the plate and insert the screws in the holes provided.
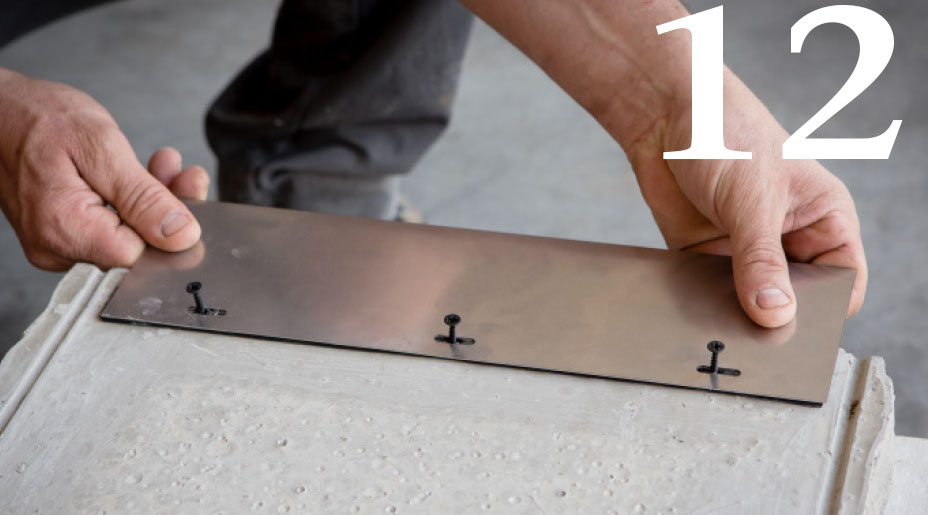
13. Secure the plate to the base of the GeoCover coping. The slots on the plate have been designed to enable the coping to be positioned further than the stipulated edge of 3 cm. In practice, if the installer decides to leave edging of 3.5 cm on one side and 2.5 cm on the other, it will also be possible to move the steel plate; what is important is that the plate covers the wall and the wall covering. Infiltrating water must be drained outside the complete arrangement. The foam strips act as a seal between the steel plate and the coping.
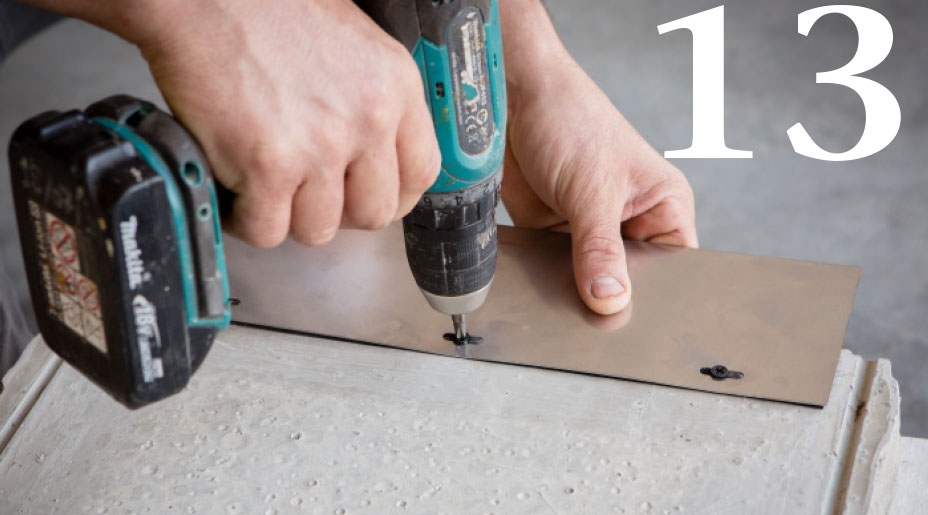
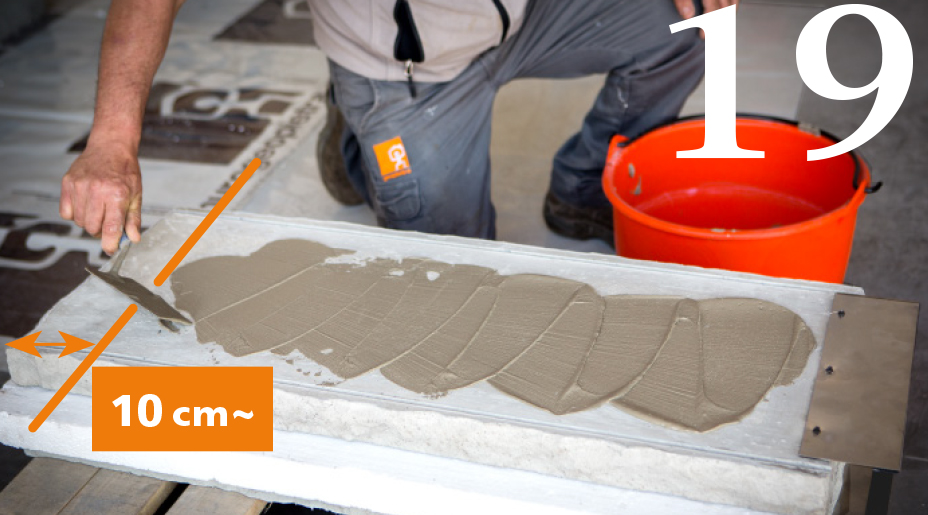
14. 15. 16. 17. 18. The installation of the coping with a cement-based adhesive requires a double coat. For approximately 10 cm on the base of the coping, on the side opposite the plate, the adhesive must not be positioned, so that the cover can directly lean on the plate sponge, previously installed
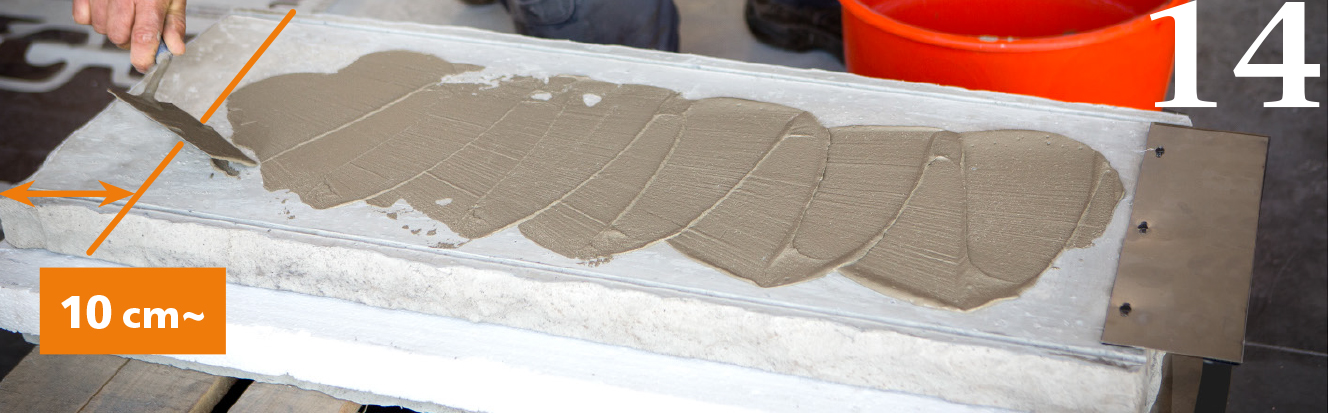


19. 20. 21. 22. Repeat the installation procedure for the following covers. The coping must be positioned to obtain the side edges required; the thickness of the joints between pieces is usually about 1 cm.


23. 24. 25. 26. 27. 28. Once the installation is completed, proceed in filling the joints. Cover edges and ends with tape to keep the coping clean and speed up finishing operations. Inject the mortar along the entire length and work it as it hardens. The Geopietra piping bag can be used to fill joints.


29. 30. 31. 32. Work the mortar also along the edges and in the area below the cover, redrawing the draining line of the drip. Remove the tape and proceed with the installation.


Stainless steel plates cannot be provided in the case of cross cuts with varying lengths. To address this, a strip of bitumen sheet of suitable width is recommended. Sides can be sealed with a generous amount of acetic silicone or two adhesive strips of expanding foam material.
If an external wall completely in manufactured stone veneer is required, without coping or end flashing, the top of the wall must be waterproofed appropriately to prevent water infiltration and detachment. It is NOT advisable to use absorbent materials such as terracotta or brick for the construction of loadbearing structures with no upper covering.
The recommended procedure is as follows:
1. Seal the top of the wall with a layer of waterproofing that is sufficiently wide to protrude over the sides of the brickwork
2. Cover the material with cement blocks of the same thickness as the underlying wall.
3. Glue corner pieces onto the top and finish with mortar, being sure to leave 1 cm of the waterproofing clear so it can act as a drip feature to remove water from the wall.
Various methods can be used to bind the various parts of the structure, the priority is to avoid creating holes in the waterproofing itself.
In the photos | Once again the lack of suitable waterproofing has led to water infiltrations over the entire wall and the formation of saltpetre, which caused the surface of the stone to deteriorate after several years.
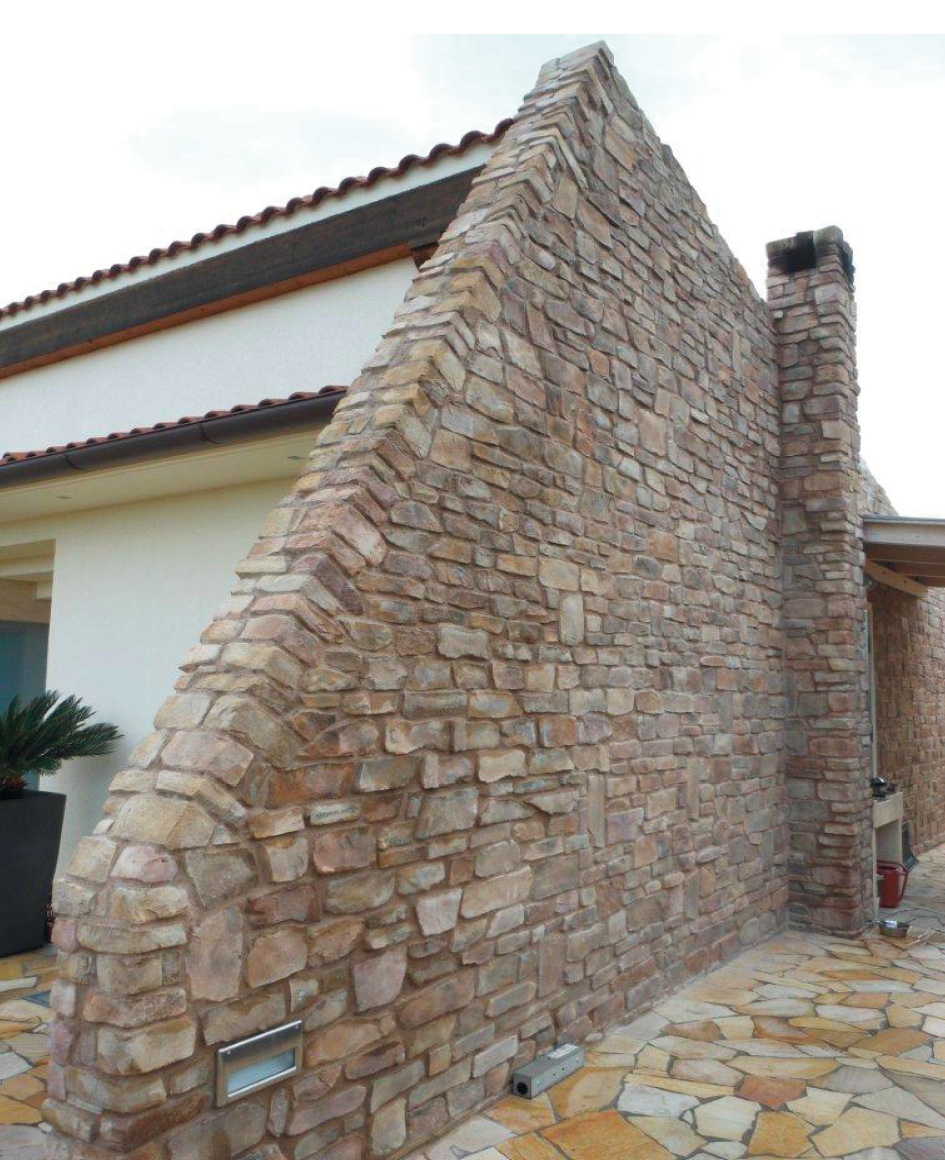
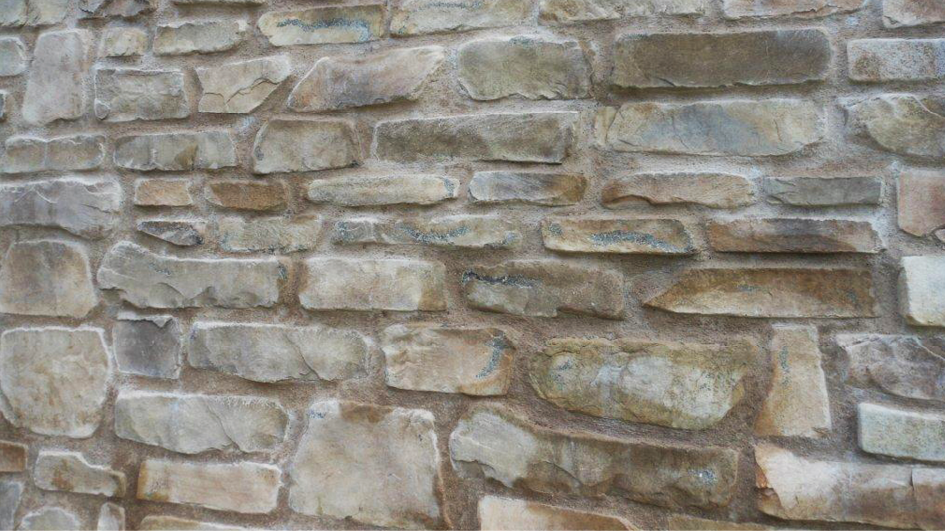
Figure 8 | shows an example with an iron connection pin.
As Geopietra manufactured stone veneer has not been designed for horizontal use, it may undergo colour changes through time. It is advisable to apply a breathable waterproofing treatment to parts positioned horizontally.

