10 | INSTALLATION TECHNIQUE
Depending on the case, THE STONE MODELS can be laid in 4 different versions:
LAYING WITH JOINTS
PLUS LAYING WITH JOINTS (Stone + GeoFit)
DRY-STACK INSTALLATION
PLUS DRY-STACK INSTALLATION (Stone + GeoFit)

1. MIX THE MATERIAL. DO NOT USE STONE FROM A SINGLE BOX OR PALLET.
Before commencing arrange a small amount of stone near the work area from different boxes and pallets to have a good choice handy. During installation try to achieve balance in terms of shape, dimensions, colour, thickness and grain pattern.

2. MARKING THE WALLS.
Using a pencil or plotting tool mark horizontal lines 20-30 cm apart on the wall to be covered, as a reference point for the next course to be completed.

3/4/5. STARTING AT CORNERS.
Fit corner pieces first, starting from the bottom with the largest pieces and proceeding upwards with increasingly smaller dimensions. As the corners have a long and short side, they must be installed in an alternating pattern with respect to the edge, making the design look more authentic by following the classic joint design of stone constructions.
Always use the wet-on-wet technique. Proceed from the bottom positioning the largest stones; this is very important for making the wall look authentic and keeping courses horizontal (see section 10.1).
Then insert GeoFit chips of a suitable shape and matching colour into the empty spaces. (see pages 16-17). In grouted versions maintain a distance of approximately 1.5-2.5 cm between the stones. Alternate small/large, tall/short, dark/light stones as much as possible to create natural-looking joints.


During installation avoid getting the stone dirty with Geocoll® by always working with clean hands.
Any adhesive marks should be removed immediately using clean water and a sponge. When cleaning the stone once installed only treat the area concerned to avoid making unnecessary marks.

6/7/8. CUTTING AND PREPARING.
To obtain the best laying result, the stones can be cut or shaped using a hammer, wide mouth pliers or trowel edge, if necessary. Straight cuts can be made using a diamond saw. Cut profiles should be positioned so they are not visible (facing downwards when the stone is below eye level and upwards when above eye level). Use thin stone to conceal any cuts better. Any stone broken during transportation can also be used for this purpose.


9. OFFSET THICKNESS IRREGULARITY WITH GEOCOLL®
Geocoll® has also been specially designed for use to compensate for any irregularities with pieces created manually. It is particularly useful on corner pieces to even out overhangs and obtain a straight edge.

Present day use of stone as an aesthetic rather than a loadbearing feature still requires knowledge and respect for the construction logic that underlay the use of this material.
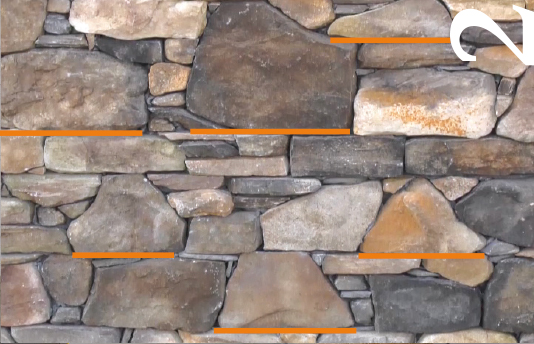
HORIZONTAL JOINTS are very important for making the wall structure look authentic and can be of varying lengths depending on taste and model.VERTICAL JOINTS must be interrupted and not continue above the height of an individual stone.
Each stone must be staggered with respect to the stone underneath in order to ‘connect’ them and give the wall coherence (see side diagrams).


The P12 Monte Panel, P16 Scaglia and P36 Rigo models are constituted by panels. As with the other series they have been produced manually and do not have regular profiles as ceramic products do, therefore they may have slight irregularities at the edges which can be corrected at the time of installation.
The same installation rules for other models still apply, but the procedure is quicker due to the configuration of the pieces, which enables a layered installation with one positioned on the other, staggering the vertical joints.
Mark a horizontal line and control the course pattern with a straight edge and level.
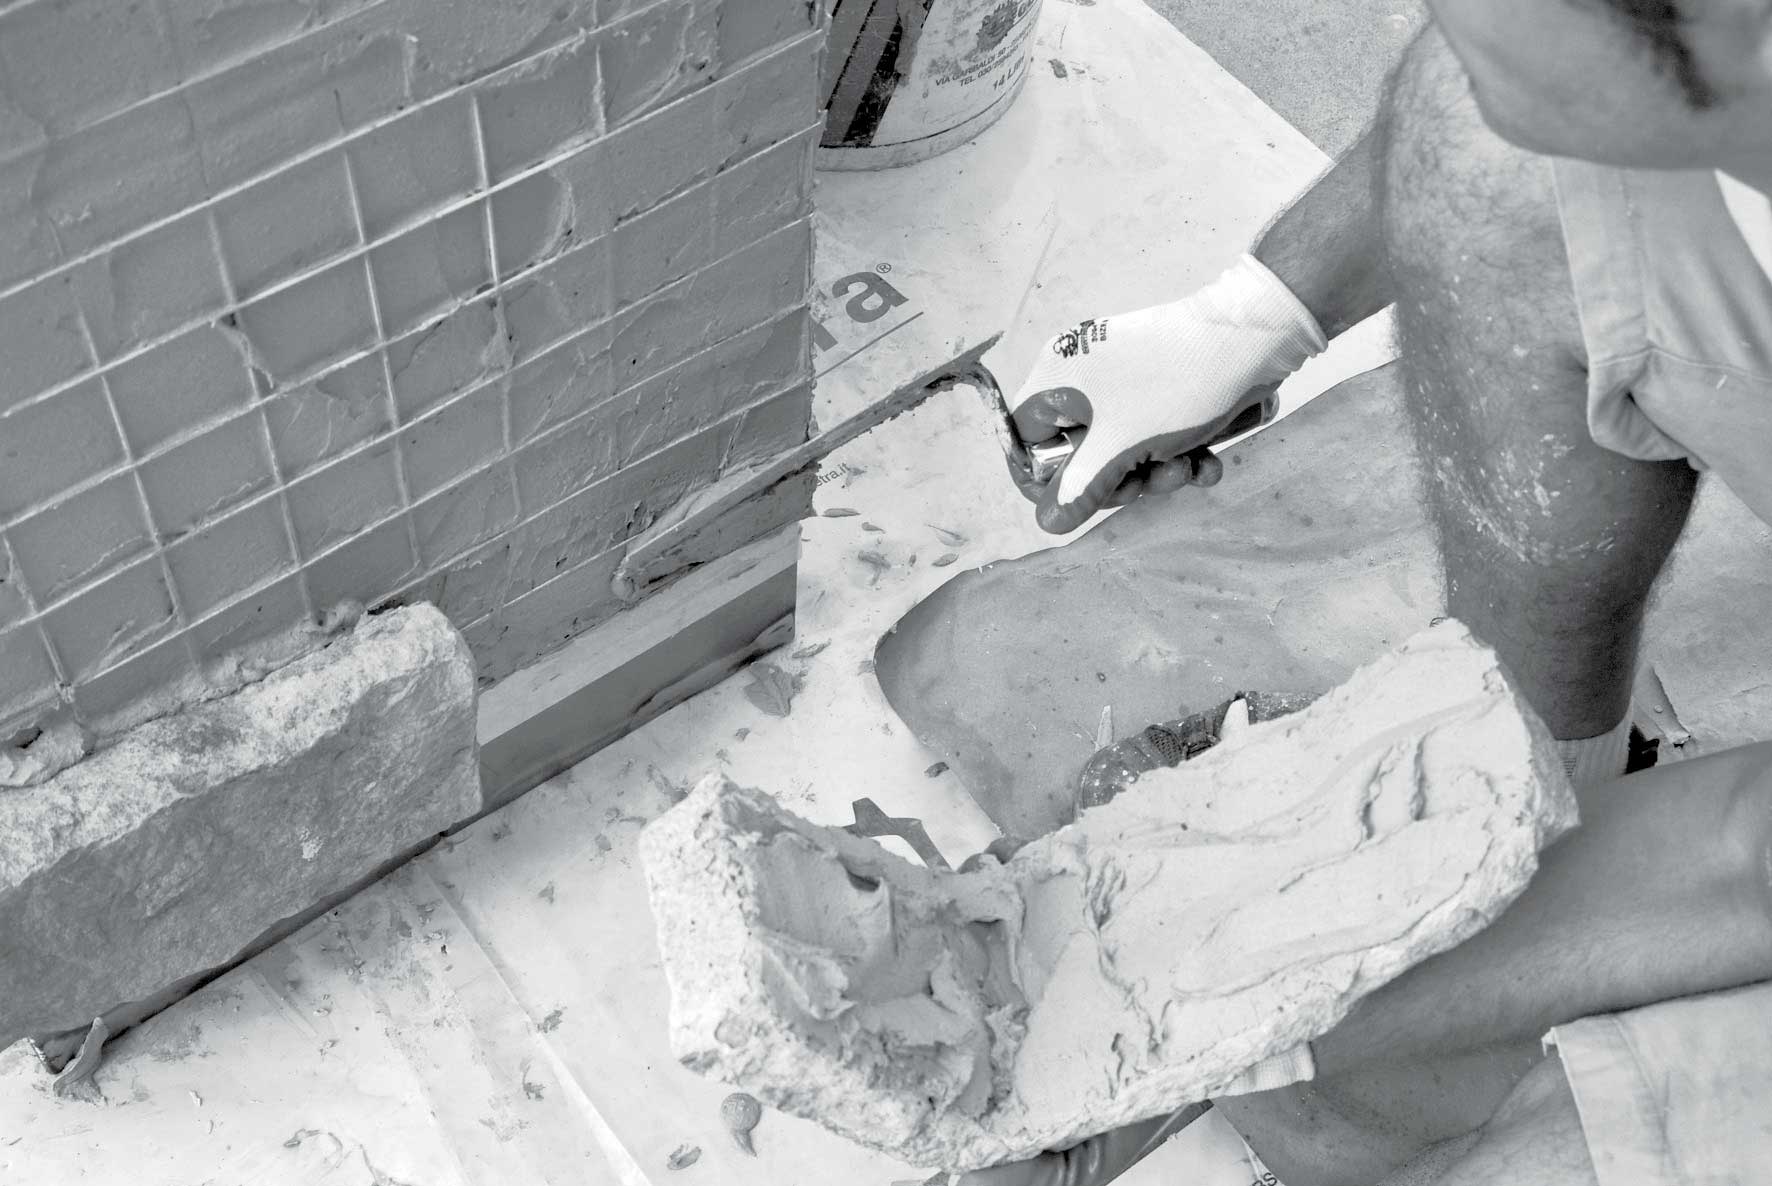
Prepare the aforementioned corrections on pieces as required using a diamond wheel. Any pieces broken when being transported can be used at the ends of walls or for butting along with the others. Positioning on the wall is very similar to that of standard ceramic tiles, but the characteristics of the material and its configuration require a completely different adhesive and base to be used.
Almost all issues that have transpired with Geopietra® products resulting from incorrect installation have occurred with these two panel models, due to their presumed ease of use.
To avoid any problems, after assessing and preparing the base install as follows: Spread Geocoll® over the entire base of the panel as with all other models, and not in a random dotted pattern.
Installation must always be implemented with a double wet-on-wet application, spreading the Geocoll® on both surfaces and sticking the stone to the base using pressure and small sideways movements to ensure perfect adhesion.
Lack of adhesive makes the work flimsy and thermal expansion and knocks will almost inevitably cause breakage.
Even an application of several square metres on the installation base, with a layer of a few mm of Geocoll® and the stone fitted immediately, is the wrong procedure. Pieces installed in the first few minutes will adhere perfectly, but as time passes the coat will undergo initial shrinkage, making the base fragile and at risk, with the possibility/certainty that the stone subsequently installed will detach (see section 11 Breakage and Detachment).
Leave joints free, putting the stone in the immediate vicinity. If joints are to be disguised glue the stone onto one of the supports with the larger surface, leaving the rest free to move. By doing so the joint will follow the shape of the stone and become invisible when grouting is completed. If the grout cracks over time it can be restored by simply replacing the grout.

Installation times vary depending on the model used. The longest times are required for the Moderno, Toce and Blumone models, whereby an expert installer would take one day to install approximately 6-8 m2 using a dry-stacking technique. Models with reasonably regular shapes such as Bergamo, Stino and Vallese can be installed at a rate of 10-15 m2 per day. Models with unspecified installation times, such as Lavone, Botticino and Turano, make it possible to achieve 15-20 m2 per day. The Scaglia and Monte Panel models (consisting of modules with heights of 10 cm and 12.5 cm respectively and variable length, designed for dry-stacking installation) have been specially designed to speed up installation times (20-25 m2/day), but the ‘natural’ effect obtained with other models is compromised to some extent. Furthermore, their presumed easy installation often means essential rules are ignored, resulting in most of the issues with detachment that have transpired to date.
All installation times indicated are based on the work being carried out by industry experts.
The characteristic of dry stone walls is the lack of mortar between stones, therefore walls owe their stability to the stones being combined and stacked correctly.
Although this isn’t required with Geopietra® manufactured stone veneer, thanks to the special GeoColl adhesive, for the purpose of authenticity it should always be installed as if a stone wall were being constructed, with the usual rules which that entails.
The COLOUR of the Geocoll® adhesive in the BLACK and BROWN shades is an important feature in the DRY-STACKING TECHNIQUE for all shades of stone, with the exception of BT bianco terra and BM bianco marmo. Coloured Geocoll® that matches the stone avoids lengthy finishing operations with mortar, and creates a natural result. Using the new, special GeoFit parts makes installation quicker and easier, and customises the final solution.


PLUS DRY-STACK INSTALLATION:
consider 10-20% extra material when placing the order, to compensate for the lack of joints. The total calculated GeoFit area should then be deducted from this increased value. Complete with Geofit according to the chart at pages 16/17.
It is essential for the stone to be installed using a wet-on-wet technique.
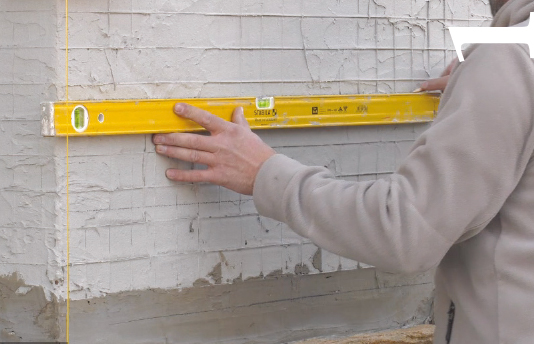
Once the base has been prepared, mark horizontal lines approximately 30 cm apart, which are perfectly level, so the installation progresses as required. (Fig.1)
The stone must always be laid horizontally with the longest side down to achieve the most stable arrangement. (Fig.2)
Sometimes edges may require some work, but endeavour to maintain the integrity of the shape of the stone as much as possible. If the visual balance of the next stone requires improvement, insert a GeoFit element in the correct shape (Figs. 4 to 8). Otherwise proceed with the remaining stones without worrying about empty spaces.


Continue to proceed horizontally, inserting taller stones every few metres to create joins. Never create vertical joins larger than the thickness of the stone itself, as this would be a weak point in a loadbearing wall.


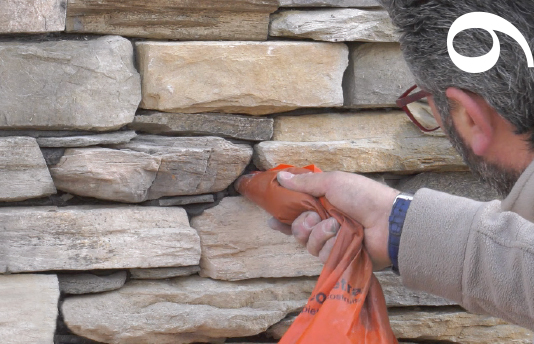
Once the installation is complete, inject the adhesive into the remaining spaces between the stones using the piping bag. Lightly stain the back of the GeoFit BIG and SASSO scales with glue and insert them in the various slots. This operation is not recommended for SMALL flakes: due to their subtle nature, the glue placed on the base of the substrate is sufficient, otherwise the nearby stones could get dirty.
Remove any excess glue the day after using a stick or small metal implement.